Add Music To Blogger
There are many ways to add music to your blog. The most common and easy way is to embed it into your blog and add it as a HTML/Javascript widget via the "Add a Page Element" in the Layout.Here I show you all how to add music as background on you blog..
You will first have to find a music file that is already hosted on the web, or if you have your own music file stored in your computer, upload it into a file host and then get the URL of the file. I actually always use geocities to get url for my favourite song..If not, you also can get the url from the mp3 hosting such as http://www.freemp3mail.com. You need select the artist the the song, then you will provided with the url for that song.
<script>
<!--
//specify FULL path to mp3
var musicsrc="http://your song.mp3"
if (navigator.appName=="Microsoft Internet Explorer")
document.write('<bgsound src='+'"'+musicsrc+'"'+' loop="infinite">')
else
document.write('<embed src=\"'+musicsrc+'\" hidden="true" border="0" width="20" height="20" autostart="true" loop="true">')
//-->
</script>
change that http://your song.mp3 with the url that you already upload or found over the internet.
the second way, you use this coding.. :
<embed src="http://your song.mp3"
width="150" height="40" autostart="false" loop="false">
Same with the previous code, change with the url that you already upload or found over the internet.
Besides that, there are other ways of adding music to your blog. For example, you can use this site SongSpots™.com to generate a script for putting into your post (the player will only appear in that post) or the Page Element (the player will then appear in all pages of your blog).
SongSpots™ are customizable flash-players that will play (i.e. stream) the song of your choice on almost any webpage that you can edit yourself, such as your blog, your online network profile, or your own homepage.
To get SongSpots™ you simply log in to Sonific.com, search for, preview and select a song you like, generate and copy the player code, and drop / paste it into any suitable input field on your desired target site, such as the 'new post' box on your blog, the 'description' field on your photo site, the 'about me' space on your social network profile, the html editor on your website wizard, and so on. The exact process varies for each site, so Sonific offers a constantly increasing number of SongSpots™guides to the most popular sites and services. The guides can be found here and they are also displayed when you get the code for your SongSpots™.

Once you have put the SongSpots™ code on your website, and have re-published it, the music you selected will be available for playback on your site. Of course, the player can be set to start automatically or not as you see fit. The visitor can start/stop the playback, change the volume and find out more about the artist. All your SongSpots™ can be saved in the MySongSpots folder, allowing you to change songs very quickly, or to just collect your favorite songs for later use.
The easiest way :
First, find a song you like and click 'Use'. Then, describe and configure your SongSpot and click on 'Activate'. Your SongSpot is now ready to be used. Select and copy the code and add it to your site. You can find instructions for the most common sites right by the code or on the Supported Sites page. You can also check out the General User Guide and the Step-By-Step Guides for the most common sites.

Categories Blog Posts, Blogger Dummies, Blogger Guide, Blogger Hacks, Blogger Help, Blogger Instructions, Blogger Tips, Blogger Tricks, Change Template, Customize, Edit, HTML, Song, Song Box
Add Shoutbox On Your Blogger
Here I use ShoutMix as example because it have nice design of Shoutbox.If You not any account on ShoutMix, just SignUp here : http://www.shoutmix.com/main/Login to your shoutbox control panel and select Use shoutbox. Select Place shoutbox on a webpage and customize the settings to your preference. Remember to copy the generated codes.
Recommended settings are width 100% and height 400 with no frame border.
1.Open a new window and go to Blogger. Login to your account and click Layout.

2.Click Add a Page Element.

3.Click ADD TO BLOG under HTML/JavaScript.

4.Paste the generated shoutbox codes under Content. Click SAVE CHANGES

5.View your blog to see the shoutbox.


6.You can also move your shoutbox and reposition it.


7.You're done! You can click the tool icon shown below to edit the shoutbox codes. In the preview below we used the Compact shoutbox template.

You can customize your shoutbox further without needing to change your shoutbox codes anymore. Have fun!
Categories Blog Posts, Blogger Dummies, Blogger Guide, Blogger Hacks, Blogger Help, Blogger Instructions, Blogger Tips, Blogger Tricks, Change Template, Coding, Customize, Shoutbox
Add Youtube Videos On Blogger
 YouTube is a popular video sharing website where users can upload, view, and share video clips. YouTube was created in mid Febuary 2005 by three former employees of PayPal. The San Bruno-based service uses Adobe Flash technology to display video. The wide variety of site content includes movie and TV clips and music Videos, as well as amateur content such as video blogging and short original videos. Currently staffed by 67 employees, the company was named TIME magazine's "Invention of the Year" for 2006. In October 2006, Google Inc. announced that it had reached a deal to acquire the company for US$1.65 billion in Google's stock. The deal closed on 13 November 2006.
Unregistered users can watch most videos on the site; registered users have the ability to upload an unlimited number of videos. Related videos, determined by the title and tags, appear to the right of the video. In the site's second year, functions were added which provide the ability to post video 'responses' and subscribe to content feeds for a particular user or users.
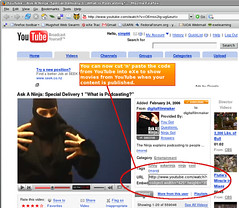
Just Follow This Method :First, you need go to YouTube Site and choose that video you want put on yor blog. Or maybe you can use any video that you already upload to YouTube.
After that, look for the box directly to the right of the video. There will have the code for embedding video. Go to the line marked Embed at the bottom of this box. Click inside the code box next to the word Embed. All of the code text should automatically be highlighted. If not, you'll need to select it. Copy this code. You can copy by right-clicking on your mouse and selecting copy from the drop-down menu.
Example of YouTube Embed Code :<object width="425" height="350"><param name="movie" value="http://www.youtube.com/v/F-yDAX6FZqQ"></param><param name="wmode" value="transparent"></param><embed src="http://www.youtube.com/v/F-yDAX6FZqQ" type="application/x-shockwave-flash" wmode="transparent" width="425" height="350"></embed></object>
Next, you need to paste this code into your blog. Login into your Blogger account. Select the edit HTML tab, and paste the code you copied from YouTube. It is important to make sure you have the HTML tab selected first. You can paste the code by right-clicking and selecting paste from the drop-down menu.

hat's it. Press the post button and then preview your blog, to make sure everything works. When readers look at your blog, they'll see the embedded video, and they can click on the play button in the center to view the video.
It is possible to modify the HTML code so that the video automatically plays as soon as it is loaded, instead of making the reader click. However, I don't recommend this. It is rude to readers who don't expect video, and it can really drag on users who have slow connections.
Categories Blog Posts, Blogger Dummies, Blogger Guide, Blogger Hacks, Blogger Help, Blogger Instructions, Blogger Tips, Blogger Tricks, Change Template, Coding, Customize, Edit, YouTube
Add Metacafe Videos On Blogger
Metacafe is a media and video sharingcommunity on the internet. Metacafe users upload and share thousands of new videos every day. Metacafe offers a desktop application, mainly targeted at users who are "video addicts" and download many of the videos every week. The desktop application is capable of downloading high-quality media to the local computer while the computer is idle.
Metacafe features user generated videos, humor videos, Internet videos (memes) and viral ads as well as sports and news-related media. Some of the other features on the site include flash games and sound clips.
Items on Metacafe have an ‘Embeddable Player’, allowing you to play the item directly from your blog/website. This feature works with various forums (MySpace, Blogger, Xanga, Friendster) and any other site which allows posting embedded tags (HTML code).
The five most recently viewed blogs/websites will be displayed underneath the item.
To embed an item in your blog/website, go to the item you wish to embed and go to the “Blog/Embed Player” tab:

The tab will expand:

Either click the “Your Blog Here” link, or check the “Feature my blog/website here.” checkbox:

Fill in your blog’s name and the URL of your personal blog (e.g. http://tarantula-videos.blogspot.com/). Now, copy the content of the “Embeddable code” textbox (click on the textbox -> right-click -> copy) and edit your blog/website. Blogger.com interface is displayed in the example below:

Make sure that you are in HTML entry mode, paste the text and save it.
By clicking the “Show advanced options >>” link, more options will appear:

Note that if you wish to change the advanced options, you must do so before pasting the embeddable code.
If you do not want a link to your blog to be displayed, you can simply copy the embeddable code from the “Embeddable Player” textbox underneath the item:
Examples of Blog That i put Metacafe videos..it is about tarantula videos :
http://tarantula-videos.blogspot.com/
Tarantula Eat A White Mouse - Science Educational Porpose - The funniest home videos are here
Categories Blog Posts, Blogger Guide, Blogger Hacks, Blogger Help, Blogger Instructions, Blogger Tips, Blogger Tricks, Change Template, Code, Coding, Customize, Metacafe, Video, Videos
Add Favicon To Blogger
 A favicon (short for 'favorites icon'), also known as a website icon, a page icon or an urlicon, is an icon associated with a particular website or webpage. A web designer can create such an icon, and many recent web browsers can then make use of them. Browsers that support favicons may display them in the browser's URL bar, next to the site's name in lists of bookmarks, and next to the page's title in a tabbed document interface.
The original means of defining a favicon was by placing a file called favicon.ico in the root directory of a webserver. This would then automatically be used in Internet Explorer's favorites (bookmarks) display. Later, however, a more flexible system was created, using (X)HTML to indicate the location of an icon for any given page. This is achieved by adding two link elements in the section of the document as detailed below. In this way, any appropriately sized (16×16 pixels or larger) image can be used, and although many still use the ICO format, other browsers now also support the animated GIF and PNG image formats.
Most modern browsers implement both methods. Because of this, web servers receive many requests for the file "favicon.ico" even if it doesn't exist. This may annoy web server administrators by creating many server log entries, and unnecessarily loading the disk, CPU, and network. Another common problem is that the favicons may disappear if the browser's cache is emptied.
Originally, Internet Explorer only used favicons for bookmarks, which created a minor privacy concern in that a site owner could tell how many people had bookmarked their site by checking the access logs to see how many people downloaded the favicon.ico file. However, since newer versions of Internet Explorer and most other browsers also display the favicon in the address bar on every visit, that concern may no longer be relevant.
First you need to create a neat favicon from this site : http://tools.dynamicdrive.com/favicon/
After you've created a neat favicon, it's time to add it to your site. To do so, follow the below simple procedure:
Upload the generated file ("favicon.ico") to your site. Verify it's there by typing http://mysite.com/favicon.ico in the browser's location, where "mysite.com" is your site's address.
Next, insert the below code in the HEAD section of your pages, at the very least, your site's main index page:
<link rel="shortcut icon" href="/favicon.ico" />
example of complete coding:
<head>
<b:include data='blog' name='all-head-content'/>
<title><data:blog.pageTitle/></title>
<link rel="shortcut icon" href="/favicon.ico" />
<b:skin><![CDATA[/*
-----------------------------------------------
Blogger Template Style
Name: K2
URL: http://www.geckandfly.com
Updated by: http://www.blogcrowds.com
Support: http://www.blogcrowds.com
----------------------------------------------- */
That's it! Note that your favicon may not appear immediately after you've completed the above two steps. In fact, it may take a few days, and in IE, sometimes the favicon will disappear from time to time due to a browser bug.
Categories Blog Posts, Blogger Dummies, Blogger Guide, Blogger Hacks, Blogger Help, Blogger Instructions, Blogger Tips, Blogger Tricks, Change Template, Code, Coding, Customize, Favicon
Make Scroll Box On Blogger
Scrollable content areas are probably the best invention since the light bulb. They allow you to specify an area that can be filled with any type of content, and then scrolled through. By using scroll content areas you have the ability to organization anything, with ease. Check out the examples below to see what all the fuss is about.
Example of Scroll Box:
Cool! Now you can put super long text on your profile, and it won't make it insanely long. This is great for use when you have tons of interests to list, music, movies, tv, and more! It can even be used for your About Me, Whom I'd like to me, and so on. It has endless, creative possibilites. Borders can be applied to it, colors, any type of style.
First Scroll Box
Your content in here.Your content in here.Your content in here.Your content in here.Your content in here.Your content in here.Your content in here.Your content in here.Your content in here.Your content in here.Your content in here.Your content in here.Your content in here.Your content in here.Your content in here.Your content in here.Your content in here.Your content in here.Your content in here.Your content in here.
Use this code :
<div style="width:200px;height:100px;overflow:auto;
border-width:2px;border-color:000000;border-style:solid;">
Your content in here.</div>
Second Scroll Box
Your content in here.Your content in here.Your content in here.Your content in here.Your content in here.Your content in here.Your content in here.Your content in here.Your content in here.Your content in here.Your content in here.Your content in here.Your content in here.Your content in here.Your content in here.Your content in here.Your content in here.Your content in here.Your content in here.Your content in here.
Use this code :
<div style="width:426px;height:100px;overflow:auto;
border-width:2px;border-color:000000;border-style:solid;">
Your content in here.
</div>
Categories Blog Posts, Blogger Dummies, Blogger Guide, Blogger Hacks, Blogger Help, Blogger Tips, Blogger Tricks, Box, Change Template, Code, Coding, Customize, Edit, HTML, Scroll
Show HTML Source-Code In Blogger
HTML has special handling for characters like <> symbols, so it doesn't work well with those characters where they shouldn't be.
Having spurious characters like those symbols in your text can have some weird effects - blocks of text not appearing, broken formatting, and generally just not seeing what you expect to see.
This can all be fixed by 'escaping' those characters. This process involves scanning the text for those characters, and replacing them with a special character-code that browsers can interpret as the correct symbol, without actually embedding that symbol in your text.
For example, the escaped character code for > is >.
Most web platforms have some way of manually encoding and decoding this escaped format.
First you need to HTML encode your source-code, we want to be able to display the HTML source so we need to encode all the HTML characters so they don't render as real HTML in the browser. For example <div> needs to be converted to <div>, otherwise it would create a div.
You could do this manually, but it takes a while so checkout this tool which does it automatically.
Example of source-code after i use that tool :
<label for="sbb" style="display: none">
Submit search form</label>
<input type="submit" name="sa"></input>
<input type="hidden" name="client" value="pub-xxxxxxxxxxxxxxxxxxxxxxxxxx">
</input>
<input type="hidden" name="forid" value="1xxxxxxxxxxxxxxxxxxxxx"></input>
<input type="hidden" name="ie" value="ISO-8859-1"></input>
<input type="hidden" name="oe" value="ISO-8859-1xxxxxxxxxxxx"></input>
Categories Blog Posts, Blogger Dummies, Blogger Guide, Blogger Hacks, Blogger Help, Blogger Instructions, Blogger Tips, Blogger Tricks, Change Template, Code, Coding, Customize, Edit, HTML, Wrap